How To Use Chat And Listen To MDR Stream ON All Devices!
Using MDR
iPhone:
Android:
PC:
Do you need to send out an electronic press kit (EPK), but don’t know what to include? Before you end up sending out an incomplete EPK, make sure that you understand the basics of what should be included. It’s not overly difficult to put together your own press kit, you just need to go through a checklist and ensure you’ve included all the necessary details.
Keep in mind, if you want to create the best EPK, you may want to enlist the help of professionals. Hiring a music promotion company or working with a music manager can help ensure that your press kit reaches the right people and contains the right information.
However, not everyone has access to a music manager or the funds to hire a company. If you fall into this category, then check out the following tips for creating your own electronic press kit.
First, review the basic elements of an electronic press kit:
This includes the fundamental items needed for an amazing press kit. Review each of these items to find out why they’re needed and how to obtain them.
First is the artist biography. There is often a debate about the importance of the artist biography. No matter how you look at it, the artist bio is often the first thing that a person sees after opening a press kit. So, you definitely need to include an artist bio and you should not take any chances by including a poorly written biography.
The artist bio will often include a few short paragraphs. This will introduce the artist and discuss the past, current, and future projects.
A press kit should also include a few professional photographs. When you send a press kit, you want news sites, papers, magazines, and other press to have photos available for publication. These should be professionally shot photos.
You don’t need to include a large variety of photos. Select a few current photographs that you feel represent you as an artist.
Include links to all of your band or artist social media accounts. This includes any Facebook, Twitter, Instagram, SnapChat, or Google Plus accounts that you have. You should also include details and statistics related to your social media presence, such as the number of followers you currently have.
A discography is an essential part of an EPK. This shows what you have done so far with your career. Your discography should include all of your releases. If any of these releases are available through online streaming sites, make sure that you include a link.
It may also be a good idea to include a few tracks. This is especially true if you do not have any recent music available for streaming online. Choose two or three of your most recent songs and include them in multiple audio formats in your EPK.
Gather a selection of the best music reviews and press clippings discussing your music. This could include both online reviews and print reviews. Scan print reviews and compile them into a folder with any other online reviews that you find. Having a good selection of reviews and praise will help show that you have already established a solid reputation.
If you don’t currently have any press articles to use, then you should think about hiring someone to write a music review. You can find affordable music review services, including from this site.
If you have a logo it should be included in your EPK. Logos are useful, as they help people remember your music. When you see an interesting logo, you’ll recognize it when you see it again.
If you don’t have a logo yet, as with any of these items, you can hire a professional. You can use online services to get a logo made at low rates. Once your logo is created it can be used in press releases, on album art, and for merchandising purposes.
The items listed above cover the items that you definitely need to include in your EPK. Though, there are other items that could be included, such as testimonials and a list of sponsors. If you want additional suggestions, take a moment to watch this electronic press kit tutorial:
At the top of the list, we discussed artist biographies. In many cases, this will be the first thing that a person looks at after opening an EPK. They want to immediately know who you are and whether or not they should bother looking at the rest of the information in your EPK. For this reason, you should make sure that your bio catches their attention.
An artist biography is an essential part of your electronic press kit. It can also be used for your biography on music streaming sites. So, it’s important to make sure that your artist biography accurately reflects the image that you want to present.
The following 7 suggestions will help improve the quality of your artist biography.
#1 – Use Short Sentences and Paragraphs
First, your artist bio needs to be easy to read. To do this, you should use short sentences and paragraphs.
Try to limit your average sentences to less than 12 or 14 words. Your paragraphs should average less than 3 sentences.
This improves the readability of your artist biography. Imagine that you’re writing it for a grade school child to read. The simpler the better.
Sometimes, it’s easier to edit the sentences and paragraphs after you finish writing. Go ahead and write your first draft, without worrying about the length of sentences or paragraphs.
Then, once you finish the draft, go through and cut some of your paragraphs in half or find ways to rewrite sentences to make them shorter.
#2 – Include the Right Details
You also need to ensure that your artist biography includes all the right details. This includes any training or your background in the music industry. Highlight important achievements, such as a degree in sound engineering or a supporting tour for a major act.
Also, discuss the style of sound that you focus on and what you hope listeners will get from listening to your music. Keep this section of your artist biography short.
Overall, your artist biography paints a picture of your musical career – not your entire life story. You don’t need to discuss your childhood or any other details that are not related to your musical career.
#3 – Don’t Write in the First Person
You should write in the third-person, instead of the first person. Don’t think of your artist bio as an autobiography, even if you are writing your own biography.
Don’t use the first-person language, such as “I” or “me”. Instead, you’ll refer to yourself as “he” or “she”.
Basically, imagine that you’re writing the biography for someone else. It’s really not that difficult. Just make sure that you go through your biography after you write it and rewrite any sections that use first-person pronouns.
#4 – Write Several Different Biographies
Before you decide on the initial draft for your artist bio, you should write several different versions. Write three completely separate artist biographies. Each time you write a new biography, you may find new ways of saying the same things.
You can then take a look at the three different versions that you wrote and choose the parts that you like the best. Combine these into one consistent biography.
#5 – Thoroughly Proofread Your Artist Bio
Once you choose a draft to move forward with, you should thoroughly proofread it to make sure there are no grammatical errors. First, use the spellchecking program built into your word processor. Then, read the entire artist biography out loud.
When you read aloud, you force yourself to read every single word. This should help you catch any mistakes that the spellchecker did not catch.
#6 – Have Someone Else Read Your Bio
Before you finalize your artist biography, you should have someone else read it. Even if you thoroughly proofread the bio, there’s a chance that you’ll miss a few grammatical issues.
Allow someone else to read the bio and catch any mistakes that you missed. They may also be able to provide some insight that will help improve your biography.
Do you need to send out an electronic press kit (EPK), but don’t know what to include? Before you end up sending out an incomplete EPK, make sure that you understand the basics of what should be included. It’s not overly difficult to put together your own press kit, you just need to go through a checklist and ensure you’ve included all the necessary details.
Keep in mind, if you want to create the best EPK, you may want to enlist the help of professionals. Hiring a music promotion company or working with a music manager can help ensure that your press kit reaches the right people and contains the right information.
However, not everyone has access to a music manager or the funds to hire a company. If you fall into this category, then check out the following tips for creating your own electronic press kit.
First, review the basic elements of an electronic press kit:
Artist biography
Professional photographs
Social media links and details
Your discography
Music reviews and press clippings
Logo
This includes the fundamental items needed for an amazing press kit. Review each of these items to find out why they’re needed and how to obtain them.
Artist Biography
First is the artist biography. There is often a debate about the importance of the artist biography. No matter how you look at it, the artist bio is often the first thing that a person sees after opening a press kit. So, you definitely need to include an artist bio and you should not take any chances by including a poorly written biography.
The artist bio will often include a few short paragraphs. This will introduce the artist and discuss the past, current, and future projects.
Professional Photographs
A press kit should also include a few professional photographs. When you send a press kit, you want news sites, papers, magazines, and other press to have photos available for publication. These should be professionally shot photos.
You don’t need to include a large variety of photos. Select a few current photographs that you feel represent you as an artist.
Social Media Links and Details
Include links to all of your band or artist social media accounts. This includes any Facebook, Twitter, Instagram, SnapChat, or Google Plus accounts that you have. You should also include details and statistics related to your social media presence, such as the number of followers you currently have.
Your Discography
A discography is an essential part of an EPK. This shows what you have done so far with your career. Your discography should include all of your releases. If any of these releases are available through online streaming sites, make sure that you include a link.
It may also be a good idea to include a few tracks. This is especially true if you do not have any recent music available for streaming online. Choose two or three of your most recent songs and include them in multiple audio formats in your EPK.
Music Reviews and Press Clippings
Gather a selection of the best music reviews and press clippings discussing your music. This could include both online reviews and print reviews. Scan print reviews and compile them into a folder with any other online reviews that you find. Having a good selection of reviews and praise will help show that you have already established a solid reputation.
If you don’t currently have any press articles to use, then you should think about hiring someone to write a music review. You can find affordable music review services, including from this site.
Logo
If you have a logo it should be included in your EPK. Logos are useful, as they help people remember your music. When you see an interesting logo, you’ll recognize it when you see it again.
If you don’t have a logo yet, as with any of these items, you can hire a professional. You can use online services to get a logo made at low rates. Once your logo is created it can be used in press releases, on album art, and for merchandising purposes.
Additional Items to Add to Your Electronic Press Kit
The items listed above cover the items that you definitely need to include in your EPK. Though, there are other items that could be included, such as testimonials and a list of sponsors. If you want additional suggestions, take a moment to watch this electronic press kit tutorial:
No matter the time of year, we frequently find ourselves gathering with family and friends to celebrate various holidays. Some holidays you may celebrate while others may just pass you by, but regardless of your own celebration, there are always people celebrating any given holiday. And, what often goes hand in hand with celebrating? Music.
When you have your own station, you have the ultimate control of the programming, meaning you can play just about anything you want at any moment. Some choose to play a variety of music while others choose to stick pretty closely to one genre.
However, something that can be helpful in growing listenership is playing holiday music, and we don't just mean playing music that correlates with Christmas, New Year's, or Hanukkah. There is music out there that coordinates with just about every holiday. That means that there is an opportunity for you to provide specialized music that many other stations and music providers in general might not provide since there are so many holidays.
Aside from Christmas, New Year's, Hanukkah, and any other celebration that goes on at the end of the year, there is Easter, July 4th, Thanksgiving, Valentine's Day, Presidents' Day, St. Patrick's Day, Cinco de Mayo, Ramadan, Mother's Day, Father's Day, Memorial Day, Halloween, Rosh Hashana, Yom Kippur, Kwanzaa, Veterans Day, and that is barely scratching the surface!
There are national holidays, state holidays, cultural holidays, months dedicated to certain subjects, and just about every single day is a unique holiday (ie. International Coffee Day, International Picnic Day, National Doughnut Day, etc.). All you have to do is look up a list of holidays and you will find pages and pages of holidays that you could potentially offer programming for on your station.
Now, you may be thinking, "there isn't music for all of those holidays." While it is true that all holidays don't have a plethora of music dedicated to them, there is always music that has a theme or topic that ties into the holiday. That is where the opportunity lies for these holidays and months that maybe don't have a ton of dedicated music. You can compile an awesome playlist of music that ties into any given holiday and play that on your station, and there you have it, a special holiday event that can potentially draw listeners to your station.
It's important to note that if you are deviating from your usual programming, you will need to let listeners know in advance what to expect. The last thing that you want to do is shock your listeners with unusual programming and turn them away. This can be avoided by letting them know about the special programming many days in advance. Tell them on your station, on social media, in your newsletter, on your website, and anywhere else you communicate with listeners.
You may also be thinking, "how is anyone outside of my regular listeners going to find my station if I'm just doing a special event for a holiday?" Obviously, if your station is not branded for a specific holiday or as a holiday station in general, your station will likely not show up in any Google searches for programming related to your chosen holiday.
But, one important way to potentially let new people know about your special holiday programming is to advertise your programming on social media many days in advance. You also might consider finding groups on Facebook and/or other online communities that would be interested in your special holiday programming to directly let them know about it. Aside from posting about it ahead of time, you need to post about it frequently. Ensure that your posts include the holiday name and any keywords related to the holiday. Furthermore, ensure that your posts include hashtags of the holiday name and keywords. It's important not to include too many hashtags as that can appear messy, but hashtags and keywords can allow those that are looking for content related to a certain holiday to find it easily and quickly. If you have posted several times in a few days on Twitter that you are having special programming for Cinco de Mayo, for example, there's a good chance that at some point you will appear in the search results for some people looking up tweets that contain "Cinco de Mayo" or "#CincodeMayo."
Note that the more celebrated the holiday is, the more likely it is that others will have programming, meaning you will be competing for listeners. Also, a highly celebrated holiday will mean it'll be harder to appear in search results on social media because of the high volume of posts related to that holiday.
So, a great place to start with incorporating holidays into your programming might be one of those more obscure holidays where you could more easily appear in search results. If you gain some listeners from unique holiday programming over time, you may become their trusted station and/or their trusted station for various holiday music. Then, as you grow, you may be better able to compete in programming for the more celebrated holidays.
Using holiday music to your advantage may not be for everybody, but it is definitely a strategy to grow your listenership, especially if you are particularly passionate about a specific holiday or holidays in general. Whatever you do, remember that the key, no matter your strategy, is always communication with current listeners as well as potential listeners.
As a radio broadcaster, it's important to interact with your listeners to give them the best experience possible and to build loyalty. It can also be extremely rewarding to talk with listeners as well as valuable for improving your station. You can interact with listeners on social media, via email or chat, at events, in person, on calls, etc. Regardless of the medium, there are some dos and don'ts to interacting with radio listeners that you should be aware of to ensure that you have the best interactions with them possible. So, keep on reading to learn about some of these dos and don'ts!
Dos:
Respond to listeners' questions, comments, critiques, etc. briefly and kindly. In some instances, note that a like or retweet may be the best course of action to acknowledge a listener.
Always think before you speak.
Engage in conversations when applicable. If you are tagged in something, look for opportunities to create a conversation with your listeners.
Be transparent in letting listeners know the best ways to support you and your station.
Post to social media regularly. Listeners want to hear from you.
Share interesting things with your audience, whether that be music, news, articles, or anything else that you believe they will be interested in.
Remember that it is better to ignore some comments than to react to them and post something without truly thinking.
Note that some conversations should be held in private, not on social media for the world to see.
When interacting in person, be mindful of your body language. Nonverbal communication is just as powerful as verbal communication.
Always proofread.
Thank your listeners for listening, following you on social media, engaging with you, and so forth.
Ensure that your interactions are personal and genuine.
Be careful with your use of all capital letters.
Use your research about your audience and known commonalities to your advantage in your interactions.
Be open to and ask for feedback.
Remember your tone. Sometimes tone can be difficult to read, especially for those that don't know you personally, so be mindful of not only what you say, but how you say it.
Don'ts:
Don't spam your listeners, even in private messaging.
Don't dwell on listeners' comments, critiques, etc. Some people will be rude with the intent to just be mean, so remember that when interacting with listeners. There will also be a larger amount of people that will be kind and want to give you genuine feedback, so let the love overwhelm any hate.
Refrain from oversharing your life. Some things may be relevant to share with your listeners, while other things cross the line and are inappropriate. Remember that while they may seem like friends in some ways, they are listeners.
Don't lose track of correct spelling and grammar on social media as well as in emails and chats.
Avoid being too pushy, sarcastic, arrogant, or needy. Your listeners will notice these things when interacting with you and it will turn them away.
Don't be rude. You know the saying, “If you don't have anything nice to say, don't say anything at all.”
Refrain from complaining to your listeners.
Don't become too bold behind the computer. It is easy to say things online since you aren't face to face with anyone. However, you are still always accountable for the things you say online.
Although these dos and don'ts may seem simple, it is easy to get caught up in your interactions with listeners, especially in the beginning. That's why it is best to have these in the back of your mind to direct your interactions to ensure both you and your listener walk away with a positive experience. Whatever you do, be sure to give your listeners some love back. They tune in and support you, so you want to show them that the love doesn't go unnoticed and that you truly appreciate them.
Here are step-by-step setup instructions to set up Mixxx:
Step 1) Download and install a copy of Mixxx from https://www.mixxx.org/
Step 2) email zach@metaldevastationradio.com for encoder details
Step 3) copy the encoder details into the live broadcasting area of your mixxx software
Step 4) Open Mixxx. Then, in Mixxx, locate the “Preferences" tab, under the Options menu.
Step 5) Locate the “Live Broadcasting” option in the Mixxx Preferences window.
Step 6) After all the settings are done you will need to download an MP3 encoder for Mixxx. You will need to go to this website: http://www.rarewares.org/mp3-lame-libraries.php as Mixxx does not own rights to redistribute MP3-Lame.
Step 7) Next, from the RAREWARES page, you will need to add the correct files from the version of Mixxx you had downloaded (either 32 or 64 bit).
Step 8) When you have downloaded the .zip file, open the file and move the files into your Mixxx folder:
Step 9) Close and re-open Mixxx. You will now be able to broadcast live by clicking "Enable Live Broadcasting" option under the Mixxx "Options" menu.
When you enable the live broadcasting, you will immediately start to broadcast live. You will override any scheduled Events and AutoDJ currently playing on MDR. MDR will be be used as a fallback, in the event your Mixxx application crashes or goes offline.
Please remember that even when you are broadcasting live, your files must transmit the correct metadata for copyrighted content (Artist - Title).
Additional steps below for Mac and Linux users:
To activate MP3 streaming on macOS, follow these steps:
- Download LAME 3.98.4 Intel (macOS 10.8+ 64-bit)
- Double-click on the downloaded zip file to unpack the file and you’ll get an installer package file
- Double-click on the installer package file and follow the step-by-step instructions in the installer
- Restart Mixxx
Another easy way to activate MP3 streaming is to use Homebrew or MacPorts, which are package managers like apt on Debian/Ubuntu Linux. They provide a convenient way to install many Open Source packages. Once Homebrew or Macports is installed, adding MP3 support to Mixxx is rather simple.
Homebrew:
Open a terminal and type the following commands:
brew install lame
Restart Mixxx
Macports:
Open a terminal and type the following commands:
sudo port install lame
Restart Mixxx
On Ubuntu and GNU/Linux-based operating systems MP3 streams can be activated by installing the package libmp3lame. Dependent on your Linux distribution the package might be slightly named different such as lame.
Open a terminal and type the following commands:
sudo apt-get install libmp3lame0
Restart Mixxx
A running computer and a good collection of properly tagged mp3s
(if you need help tagging mp3s click here https://www.mp3tag.de/en/)
You will need a microphone if you plan on talking in between songs.
You will need some DJ software like MIXXX https://www.mixxx.org/ which is free or Sam Broadcaster if you are pro. https://spacial.com/sam-broadcaster-pro/
We help you set up your encoder on your software of choice.
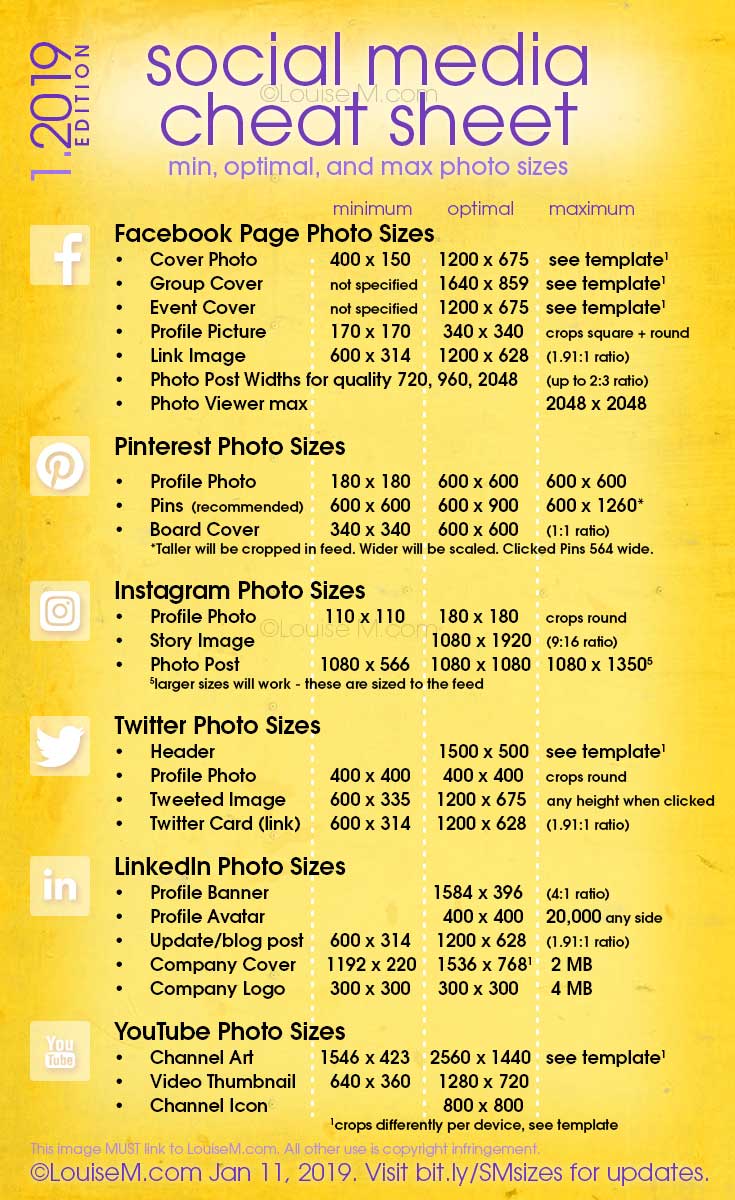
Searching for the ultimate social media cheat sheet?
Here are the optimal, updated social media sizes, as of January 11, 2019.
Full chart at the end of the post. Log in as a member to get your free printable!
I’ve included ALL essential sizes for Facebook, Pinterest, Instagram, Twitter, LinkedIn, AND YouTube on the chart. You’ll find notes about aspect ratio and maximum file size where known.
Google+ and Tumblr sizes are listed at the end of this post, though not on the chart.
multi platform image sizes banner
Social media image sizes 2019 that work across platforms
Here’s a brief rundown of some critical social media photo sizes.
Best size for image posts
1200 pixels square is ideal for Facebook and Instagram posts. It also works well for Google+ and LinkedIn posts – and for Twitter, if you keep any type or other critical elements away from the top and bottom of the image.
A square is a 1:1 aspect ratio.
Squares can also be posted on Pinterest. Test these against the recommended 2:3 Pins, and see how squares go over with your audience.
If Pinterest is your main platform, try the 2:3 images on Facebook, as they work there too.
Want to cover both Instagram and Pinterest? Try 4:5 aspect ratio. It’s my favorite size for IG, as it takes up all available height in the feed. Note that it’ll still be cropped to a square on your profile gallery.
Best size for link posts
Facebook, Twitter and Linked in are all recommending 1200 x 628 pixels, which is 1.91:1 aspect ratio. You need to be including this shape image on every blog post and page!
Multiply the width of your content area by .524 to get the image height. Since my content area is 720px wide, this comes out to 720 x 377 pixels for me.
How do I get images to these sizes?
Q: Do you have recommendation for how to get photos these desired image sizes? I am using iPhoto and I am not getting exact dimensions you describe.
A: You could use a free online photo editor like pixlr.com. Alternatively, you can use an online image creator that has lots of sizes already set up for you!
The two easiest ones I’ve found are Stencil and Snappa. Choose a size template, pick or upload a photo, and it’s automatically sized to fit. Adjust cropping as desired.
Both have a free option or free trial. The paid plans have an amazing Instant Resize feature, so you can make perfectly-sizes images for every network! Watch it on Stencil below.
Disclosure: If you upgrade for additional features, I may get a small commission. I only recommend what I’ve tried, and think you’ll love!
Facebook Photo Sizes 2019
In August 2018, Facebook applied Page Templates based on your business type, such as Services, Restaurant, or Store. This hasn’t affected the image sizes though. Cover photos are still the same.
Recommended proportion for all Facebook cover photos: 16:9.
This works perfectly on mobile. You must allow cropping top and bottom on desktop, so don’t place text or other critical elements near the top and bottom.
This proportion works out to: 1200 x 675, 1640 x 923, or 1920 x 1080. Your choice!
I always recommend going with a larger image for best quality. While FB sometimes specifies minimum sizes required for upload, modern displays have such great resolution that low quality images don’t cut it any more. Go BIG!
New in June 2017: You can use a video as your cover photo.
Tell More of Your Story
Instead of a cover photo, now you can use a video. It can be 20-90 seconds and should be at least 820 x 312 pixels.
Instead of a cover photo, now you can use a video. It can be 20-90 seconds and should be at least 820 x 312 pixels.
Re minimum wall post size, I hope you are using larger photos than minimum already! Up to 2048 x 2048 works for Facebook photo posts.
For more details on Facebook image sizes, see the linked posts.
Facebook Page Cover photo size: 820 x 312 desktop / 640 x 360 mobile | Optimize for both!
Facebook Profile photo size: upload 170 x 170 | Make the best Facebook Profile Picture
Facebook Link preview size: min. 600 x 314 | How to get a LARGE link thumbnail
Facebook Photo post size: on the wall, 476 x varied height, larger gives better quality.
Facebook Group Cover photo size: 1640 x 859 minimum, this post helps you optimize for mobile and desktop.
Facebook Event Cover photo size: 1200 x 675, see the post for details: Facebook Event Cover for Desktop AND Mobile
Facebook ad sizes: COMPLETE infographic of ALL Facebook photo sizes, including ads: Facebook sizes infographic
Pin the Facebook image sizes cheat sheet, and read on.
Facebook image sizes cheat sheet
Pinterest image sizes banner
Pinterest Photo Sizes 2019
Pinterest has verified that Pins taller than 2.1 times their width will be cropped in the feed. They recommend 600 x 1260 as the tallest proportion for Pins. However, taller Pins will be seen in full when clicked (March 2018).
I still recommend tall infographics! They perform for me. Read all the details on Pinterest sizes.
Pinterest’s recommended sizes are 600 x 600, 600 x 900, and 600 x 1260. You can still use your favorite width, and keep your Pin dimensions in these proportions:
1:1 or square
1:1.5 or slightly tall
1:2.1 or moderately tall
Tall as you like, but will be cropped in feed
Note that Pins no longer appear at 736 pixels wide when clicked (changed Fall 2017). Now they’re never seen bigger than 564 pixels wide.
I had a reader who made Pin images to 564 width and reported that gave her the best quality result after uploading. However, I’ve also been told that Pinterest says not to go smaller than 600px width.
Pinterest is recommending 2:3 proportion as optimal (example: 600 x 900 pixels), and also saying squares are fine. I don’t see squares performing as well as taller Pins, though. If you already have square images for Instagram, test with your audience on Pinterest.
Pinterest board covers are SQUARE. I recommend 600 x 600. If you use the Showcase feature, you’ll want to make sure you make them at least 340 x 340.
Note: Few Pinners look at profiles and boards, so covers aren’t a necessity.
Pinterest Profile Photo size: 180 x 180 or larger
Maximum pin width when clicked: 564
Board cover: suggested minimum 340 x 340
Minimum image size that can be pinned: 100 x 200 source
Pin the Pinterest image sizes cheat sheet, and read on.
Pinterest image sizes cheat sheet
Instagram image sizes banner
Instagram Photo Sizes 2019
Instagram posts are no longer limited to square! However, your images will still be cropped to square on your profile page gallery.
For details, read: Instagram Photo Format Breaks Out of the Box!
Instagram Profile Photo size: 110 x 110 minimum | Rock your IG profile photo
Instagram photo size: minimum 1080 width for best quality | Instagram photo size tips
Instagram landscape photo size: 1.91:1 proportion, or 1080 x 566.
Instagram portrait photo size: 4:5 proportion, or 1080 x 1350.
Pin the Instagram image sizes cheat sheet, and read on.
Instagram image sizes
Twitter image sizes banner
Twitter Photo Sizes 2019
Tweeted image size changed in 2017 and is still quoted incorrectly almost everywhere.
Let’s go by what Twitter says, shall we?
Twitter Header size: 3:1 or 1500 x 500 pixels | Twitter header details and free template
Twitter Profile size: 1:1 or 400 x 400 pixels | New round Twitter profile picture
Tweeted Image size: 16:9 or 1200 x 675 pixels | Details on Twitter Images
Twitter Card image size: 1.91:1 or 1200 x 628 pixels | Details on Twitter Images
Tweeted images are not 2:1 proportion! If you post that size, the edges will be cut off in the stream.
Tweet images will still be shown in full when clicked, so you can use square for portability across social media networks – but they’ll be cropped in the feed on mobile.
Multi-image tweet sizes
Multi-image tweet sizes
For two images, the images will be side by side, both at 7:8 aspect ratios.
For three images, there will be one 7:8 aspect ratio image on the left, with two 4:7 aspect ratio images running up the right side of the image.
For four images, there will be four 2:1 aspect ratio images in a grid.
Pin the Twitter image sizes cheat sheet, and read on.
Twitter image sizes cheat sheet
LinkedIn image sizes banner
LinkedIn Photo Sizes 2019
Those maddening responsive background images (banner / cover photo) on personal profiles were dumped in August 2017. The new recommended size is 1584 wide by 396 high. This is exactly 4:1 proportion.
You can also crop, filter, and adjust your photo after you upload it to LinkedIn.
Tips from LinkedIn:
If your background image appears blurry or pixelated, please choose an image with a file size as close to the maximum (8 MB) as possible, as images with larger file sizes typically look better. Photos will also look better than images with logos.
You can crop, filter, and adjust the NEW LinkedIn background photo – August 2017.
LinkedIn image recap: Max file size 8MB and file type must be PNG, JPEG, or GIF.
LinkedIn profile cover photo: 1584 wide by 396 high. This is exactly 4:1 proportion.
Linked in profile picture: Per LI, upload any size between 400 x 400 pixels and 20,000 x 20,000 px.
LinkedIn blog post link shares match Facebook’s! 1200 x 628 px.
LinkedIn photo share: 1200 x 1200 square looks best on desktop, but gets cropped to horizontal in the mobile feed. The link share size works best there¹.
LinkedIn Company cover photo size: 1536 x 768 px².
LinkedIn logo size: 300 x 300 square. No more horizontal.
More company and career page image sizes on LinkedIn here.
¹LinkedIn photo post size seems difficult to determine. It appears to be a slightly taller shape than previously, but no one seems to agree on the size (see this discussion). If you find someone who makes picture quotes specifically to a LinkedIn size, won’t you let us know?
One woman suggested 792 x 528px. I checked and it did look the same on desktop and mobile. However, when you click on desktop, it gets so much bigger. I’d double those dimensions for best clarity.
LinkedIn company cover photo
²There’s some question as to how they work. The height is greatly cropped. I suspect that the cover image proportions work for mobile.
Just as with Facebook and Twitter, the height gets cropped on desktop – although much more severely.
Unfortunately, you’ll have to create something and test it on different devices if it has critical elements that need to show. Or else think of it as more of a “background” image that doesn’t have faces, type, or other elements that would look bad when cropped on different devices.
What LinkedIn recommends:
Your cover image may have to be adjusted to fit the screen which may involve trimming the image horizontally or vertically. We recommend uploading a high-quality image with as little text as possible to ensure an optimal display on all devices and screen sizes. Our accepted image formats for uploads are PNG or JPEG.
Here’s a LinkedIn company cover photo template from Breanna Tillman that a reader shared: Download the LI company cover.
The proportions don’t seem correct, but I’ll let you mess with that if you want. With these responsive headers, I recommend uploading an appropriate photo background and letting the cropping fall where it may. With different crops on different devices, LinkedIn company page headers have become too difficult to place text on.
Pin the LinkedIn image sizes cheat sheet, and read on.
LinkedIn image sizes cheat sheet
Now that you’ve got the sizes – what images should you post?
YouTube image sizes banner
YouTube Photo Sizes
YouTube Channel Art size: 2560 x 1440 | Right click to download template
Be sure to check the template as cropping varies widely from TV to mobile to desktop
Video thumbnail: 1280 x 720
Channel icon: 800 x 800
Google+ Photo Sizes
Is anyone on Google+ any more? If you are, here are your sizes:
Google+ Cover photo size: 1080 by 608 (this is also 16:9, so reuse your FB cover
Google+ Profile photo size: 250 x 250
Tumblr image sizes banner
Tumblr Photo Sizes
It’s hard to find image sizes for this platform, and one reason may be that it’s pretty freeform. Different themes can vary greatly.
I don’t use Tumblr and decided not to add it to the cheat sheet, since I won’t know if things change.
April 2017: Here’s an excellent Tumblr sizes overview offered by reader Morgana Johnson:
Although all themes are different, the most common sizes still display 500 and 400 width posts (and most “photography” themes either display everything with a width of 1280, or even the highest resolution available).
However, anything on the dashboard feed is shown at and resized to 540. Size limitations have also risen to 10MB for pictures, and supposedly 3MB for animated .gif images (However animated gifs are just buggy on tumblr, it’s best to “aim” between 1-3MB.)
Anyone using tumblr as a portfolio would have the best experience, and largest variety of themes to choose from, if they create images with a width of 500 or 400. However, those who plan to market themselves and gain a following on tumblr should create images meant to be displayed at 540. Those particular users should also pay close attention to the following new feature:
Tumblr has implemented a “dashboard pop-over” with a header, which works both as a mobile theme and allows desktop users to have a quick glance at a blog without leaving the dashboard. The header displays at “various sizes” with an aspect ratio of 16:9. Generally, it displays at 1240 x 700 for desktop browsers, but is optimized at 640 × 360 for mobile.
(It can also display animated gif images with the same size restrictions as posts. From my personal experience, however, I can’t get any header to animate if it’s larger than 1.5MB.)
It’s also worth noting that users whom choose to keep the default theme show the same header at 3000 x 1055 on their blog, and displays posts with a width of 540. ~MJ
Social Media Cheat Sheet 2019: Must-Have Image Sizes
I hope you find my cheat sheets helpful! Let me know if your experience differs.
Members: download a printable version by logging in (Or get a free membership here!)
Help battle the misinformation being passed around. Size does matter!
Pin and share this complete updated social media cheat sheet with your friends and followers.